Free IoT SSH On Windows 10: Setup Guide & Tips
Can you truly access your Internet of Things (IoT) devices remotely, securely, and without spending a dime, all while leveraging the power of Windows 10? The answer is a resounding YES, and this guide will illuminate the path to achieving precisely that. In an era where interconnected devices are becoming the norm, the ability to manage them from anywhere is no longer a luxury but a necessity. This article will act as your comprehensive manual, guiding you through every step of setting up a free and secure remote SSH connection for your IoT devices using Windows 10.
The landscape of modern technology is littered with challenges, particularly in the realm of cybersecurity. With the proliferation of IoT devices, the potential attack surface has expanded exponentially. A secure remote connection is, therefore, paramount. This guide will explore how to harness the power of Secure Shell (SSH) to remotely configure and manage your devices, ensuring your data remains encrypted and your system protected from malicious actors. Whether you're a seasoned tech professional, an enthusiastic hobbyist, or simply seeking to streamline your workflow, understanding the intricacies of setting up and maintaining a secure SSH connection will significantly enhance your efficiency and security posture.
Before we proceed, it's essential to establish a clear understanding of the core components involved. You'll need a Windows 10 machine, an SSH client (like PuTTY), the IP address of your IoT device, and the appropriate login credentials. Additionally, configuring port forwarding on your router and ensuring your IoT device is accessible are crucial prerequisites. In this article, we will break down each step in detail, ensuring you have a solid grasp of the entire process.
- Troubleshooting No Search Results Fixes Tips Google Discover
- Avoid Errors Addressing No Results Bengali Entertainment Insights
The advantages of using Windows 10 for IoT remote SSH management are numerous. Windows 10, far from being limited to gaming and office tasks, presents a robust platform for managing your IoT devices. It provides a stable environment for the necessary software, making the configuration and maintenance processes more manageable. Moreover, the widespread availability of Windows 10 ensures that you can access your IoT devices from almost any location, assuming an internet connection is available. As the digital world grows more interconnected, this functionality is not merely useful; it's becoming essential for individuals and organizations alike.
The process of connecting to an IoT device via SSH on Windows 10 might initially seem daunting, but it's surprisingly straightforward. You'll begin by installing and configuring an SSH client, such as PuTTY. Next, you'll enter the IP address of your IoT device along with the associated login credentials. Once this is complete, you will then configure the SSH client with your device's specific settings to establish a secure, encrypted connection. With this configuration in place, you'll be able to remotely access your IoT devices from anywhere, offering unparalleled convenience and control.
This article aims to be more than just an instructional guide; it's a roadmap to empowering you with the knowledge and skills to manage your IoT devices with confidence. We will delve into the critical significance of secure connections and the practical methods you can deploy to achieve remote SSH access without compromising your device's security. This understanding is crucial in today's interconnected world, where the potential for cyber threats is ever-present. By securing your connection, you're proactively safeguarding your data and protecting your systems from malicious activity.
- Sebastian Croft From Game Of Thrones To Heartstopper More
- Park Solomon Lomon Unveiling The Rising Korean Stars Journey
The methods presented here are designed to provide you with a free of charge solution, saving you money and resources while delivering robust remote access. Furthermore, this guide will provide instructions on how to establish a secure remote IoT VPC SSH connection on Windows 10, ensuring that your devices are protected by additional layers of security. From setting up your Virtual Private Cloud (VPC) to setting up a secure SSH tunnel, we will examine every facet of this process, ensuring you have all the resources and information needed to secure your IoT devices.
The utilization of the command line, using SSH from anywhere on Windows 10, offers an efficient solution to access your devices remotely. This method provides a potent means of accessing your devices remotely without additional costs. This approach, whether you're managing a smart home or working on industrial automation, is a key to unlocking the full potential of remote access. Our goal is to empower you, providing you with the tools and understanding necessary to effectively manage and maintain your IoT devices from any location.
The following table provides a comprehensive overview of the key components and steps involved in establishing a secure remote SSH connection on Windows 10:
| Component | Description | Steps |
|---|---|---|
| SSH Client | Software used to establish a secure connection to the IoT device. PuTTY is a common and free option. | 1. Download and Install. 2. Configure with IP address and port (usually 22). 3. Enter login credentials. |
| IoT Device IP Address | The unique numerical address assigned to your IoT device on your network. | 1. Find the IP address of your IoT device (check device settings or router). |
| Login Credentials | The username and password required to access the IoT device remotely. | 1. Ensure you have the correct username and password. 2. If necessary, reset or create credentials. |
| Port Forwarding (Router) | Configuration within your router that allows external connections to be directed to your IoT device. | 1. Access your router's configuration page. 2. Locate the port forwarding settings. 3. Forward port 22 (SSH) to the IP address of your IoT device. |
| Dynamic DNS (Optional) | Allows you to connect to your device using a domain name, even if your public IP address changes. | 1. Sign up for a Dynamic DNS service (e.g., No-IP). 2. Configure your router or device to update the DNS record. |
| Firewall Configuration (Windows) | Ensuring that the Windows firewall allows SSH connections. | 1. Open the Windows Firewall. 2. Allow inbound connections on port 22 (or the port you are using). |
| SSH Key Authentication (Recommended) | A more secure method of authentication than using passwords. | 1. Generate an SSH key pair (public and private). 2. Copy the public key to your IoT device. 3. Configure your SSH client to use the private key. |
| VPC/SSH Tunneling (Advanced) | Setting up a secure tunnel for additional security, useful when connecting via public networks. | 1. Configure your Virtual Private Cloud (VPC). 2. Establish an SSH tunnel from your local machine to the VPC. 3. Connect to your IoT device through the tunnel. |
For more in-depth information and troubleshooting tips, please consult the official PuTTY documentation: PuTTY Official Website.
Now, lets get into the practical steps needed to accomplish remote SSH access. We will begin with downloading and installing PuTTY, a popular and versatile SSH client. Once installed, youll need to configure it with the IP address of your IoT device. This address is crucial, as it tells PuTTY where to connect. Finding the IP address can involve looking through your router's connected devices, checking the devices configuration interface, or using network scanning tools if necessary. Ensure the correct IP address is used for your IoT device.
Next, youll need to enter the port. The standard port for SSH is 22. Unless you've intentionally changed the port on your IoT device, this is the port you will use. Then enter the login credentials, which typically involve a username and password. Be sure to use the correct login credentials for your IoT device.
Once youve provided the essential information, you will then configure port forwarding on your router. This step is essential because it allows external connections to be directed to your IoT device. The precise steps depend on your router model, but generally, you'll need to access your router's configuration panel, locate the port forwarding section, and create a rule to forward traffic on port 22 (the standard SSH port) to the internal IP address of your IoT device. Always ensure you have a strong, unique password to protect your device from unwanted access.
For an added layer of security, consider utilizing SSH key authentication instead of password-based authentication. This involves generating a key pair (a public and private key) and installing the public key on your IoT device, which is significantly more secure than relying solely on passwords. You will need a tool such as PuTTYgen, available as part of the PuTTY installation, to generate your keys. After key generation, you can configure your SSH client to utilize the private key for authentication.
Furthermore, if you're dealing with more sensitive data or operating in a less secure environment, setting up a Virtual Private Cloud (VPC) and establishing an SSH tunnel can dramatically enhance security. This method allows you to create an encrypted connection through which all your traffic flows. The VPC acts as a secure intermediary, shielding your traffic from potential interception. Setting up a VPC can vary based on your cloud provider, but it usually involves creating a virtual network and configuring your firewall rules to allow the necessary SSH traffic. Subsequently, you will set up an SSH tunnel from your local machine to the VPC and connect to your IoT device through this secured tunnel.
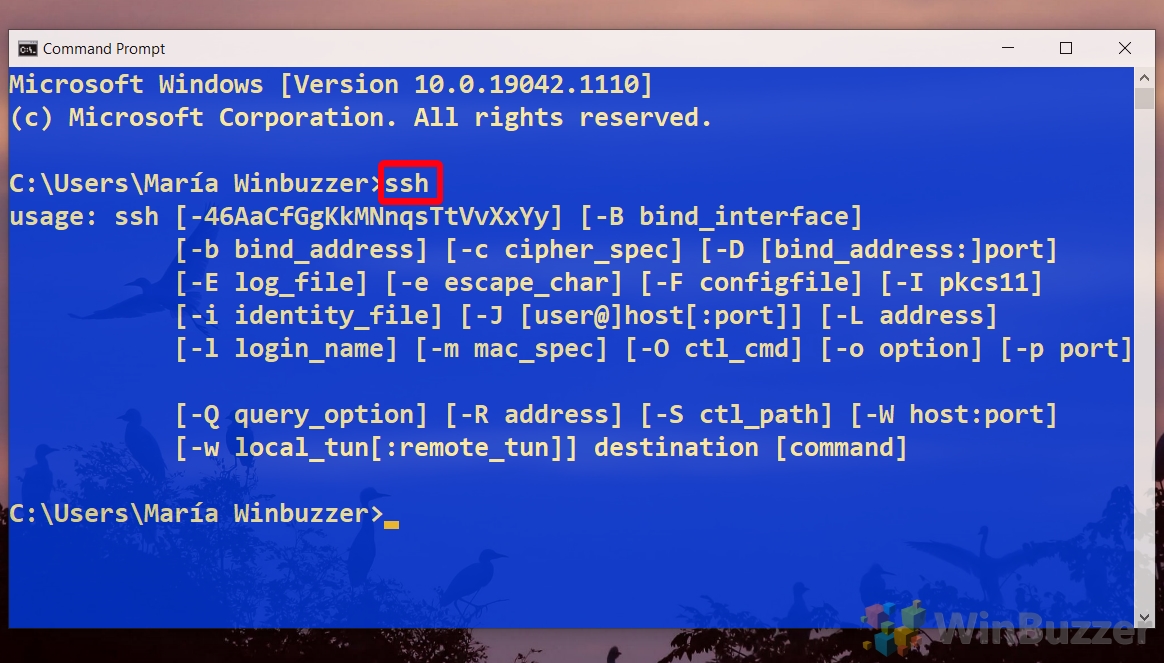
Using the command line, by using the ssh command, offers another way to remotely access your devices. The ssh command, which is typically available in the Windows command prompt or PowerShell, allows for direct access to your IoT devices through the command line. The syntax is relatively straightforward: ssh username@ip_address. The command will prompt you for your password (or use key-based authentication if configured). This direct, command-line approach offers efficient access for system administration and automation tasks.
The security aspect of this setup cannot be overstated. Encryption is fundamental to securing your data, and SSH employs robust encryption to protect your commands and data. This ensures that sensitive information is shielded from prying eyes. Furthermore, by implementing strong passwords and key-based authentication, you create a formidable barrier against unauthorized access. By taking these precautions, you minimize the likelihood of unauthorized intrusion into your IoT devices.
To further bolster the security of your connection, keep your devices' software up-to-date. Software updates often include critical security patches to address vulnerabilities that hackers might exploit. Enabling a firewall on your Windows machine, along with your IoT device, is another crucial step. Firewalls act as a gatekeeper, controlling network traffic and preventing unauthorized access. Configure your firewalls to permit SSH traffic on port 22, but only from trusted IP addresses.
In today's world, the ability to manage devices remotely is no longer a luxury but a necessity. The convenience and productivity gains are evident across a range of applications, from smart home automation to industrial control systems. This is why remote SSH access is becoming a must-have. With the knowledge provided in this article, you'll be equipped with the tools necessary to securely manage your IoT devices from any location, giving you the ability to respond quickly to issues and maintain control, regardless of your physical location.
In conclusion, with the right knowledge and tools, establishing a secure, remote SSH connection to your IoT devices on Windows 10 is readily achievable and free of charge. By following the steps outlined in this guide, you can create a secure and efficient system for managing your devices from anywhere in the world. The benefits are clear: enhanced productivity, increased control, and the peace of mind that comes with knowing your devices are secure. The key takeaway is that securing your IoT devices is not just about convenience; it is a proactive measure to safeguard your valuable data and ensure the integrity of your systems. Take control, implement these measures, and unlock the full potential of your IoT devices today.


Detail Author:
- Name : Isaac Pfeffer
- Username : wkreiger
- Email : brook26@hotmail.com
- Birthdate : 1989-09-21
- Address : 736 Kutch Rest Apt. 313 Port Jacintoburgh, WI 52643-4160
- Phone : (240) 490-4702
- Company : Lubowitz LLC
- Job : Manufacturing Sales Representative
- Bio : Eius accusamus quas nihil molestiae qui similique. Nostrum dolores earum facere autem qui quas facere voluptatum. Vel accusamus nisi non iste in maxime. Rem quaerat voluptatem sunt quidem ipsa aut.
Socials
tiktok:
- url : https://tiktok.com/@nicholas.torphy
- username : nicholas.torphy
- bio : Impedit quaerat similique in.
- followers : 5121
- following : 630
twitter:
- url : https://twitter.com/nicholas.torphy
- username : nicholas.torphy
- bio : Dolor rerum minus quo fuga necessitatibus. Facere aspernatur vero est vel. Aut omnis et voluptas magni repudiandae hic deserunt non.
- followers : 5864
- following : 2416
linkedin:
- url : https://linkedin.com/in/nicholas.torphy
- username : nicholas.torphy
- bio : Impedit qui nobis adipisci quisquam.
- followers : 3101
- following : 2735
facebook:
- url : https://facebook.com/ntorphy
- username : ntorphy
- bio : Illo voluptas et debitis sed ad voluptatem quidem.
- followers : 1119
- following : 65

 devices remotely, securely, and without spending a dime, all while leveraging the power of Windows 10? The an)